Mastering the 4-4-2 (2nd Variation): Ultimate Custom Tactics for High-Level Play
Kalle Reinhard

- Why the 4-4-2 (2nd Variation)?
- The Custom Tactics Setup
- Player Roles & Instructions: The Blueprint
- In-Game Performance Breakdown
- Pros and Cons
- Conclusion
When it comes to succeeding in high divisions and FUT Champions in EA Sports FC, tactics are everything. Many players struggle to find the perfect balance between defense and attack, especially in a meta that rewards both aggressive pressure and composed build-up. If you're looking for a formation that blends solidity with flair, the 4-4-2 second variation featuring two CDMs is a top-tier option.
In this guide, we’re diving deep into the custom tactics for the 4-4-2 (2) formation, breaking down everything from build-up style to player roles. Whether you’re on PlayStation, Xbox, or PC, this setup is designed to optimize both ends of the pitch.
Let’s get straight into it.
Why the 4-4-2 (2nd Variation)?
The classic 4-4-2 is a formation with a long legacy in football and FC 25 alike. But in its traditional form with two central midfielders (CMs), defending can be a serious challenge, especially against players who excel at quick counters or use formations with a central attacking midfielder (CAM).
This is where the second variation shines. With two central defensive midfielders (CDMs), you gain critical stability at the back. These CDMs act as a screen in front of your defense, giving you a far better chance of controlling transitions and limiting damage during turnovers.
You don’t lose offensive capabilities either. With two strikers, two wide mids, and a box-to-box CDM, you can overwhelm opponents with smart runs and quick passing combinations.
The Custom Tactics Setup
Let’s break down the tactical instructions that make this version of the 4-4-2 so effective.
Build-Up Play: Balanced
While counter-attacking might seem tempting, using Balanced build-up allows for more passing options. Counter can be limiting—especially if you don’t have multiple players supporting the attack. Balanced gives you structure, which is essential if you like to control the game.
Chance Creation: Balanced (default)
No need to get too fancy. This ensures your players make natural, intelligent movements both centrally and out wide.
Defensive Style: Balanced
Defensive Depth: 70
A 70 depth gives you enough pressure to make your opponent uncomfortable without leaving you exposed. You're not going full all-out press (like 95 depth), but you're still applying consistent pressure especially valuable with your two CDMs covering defensively.
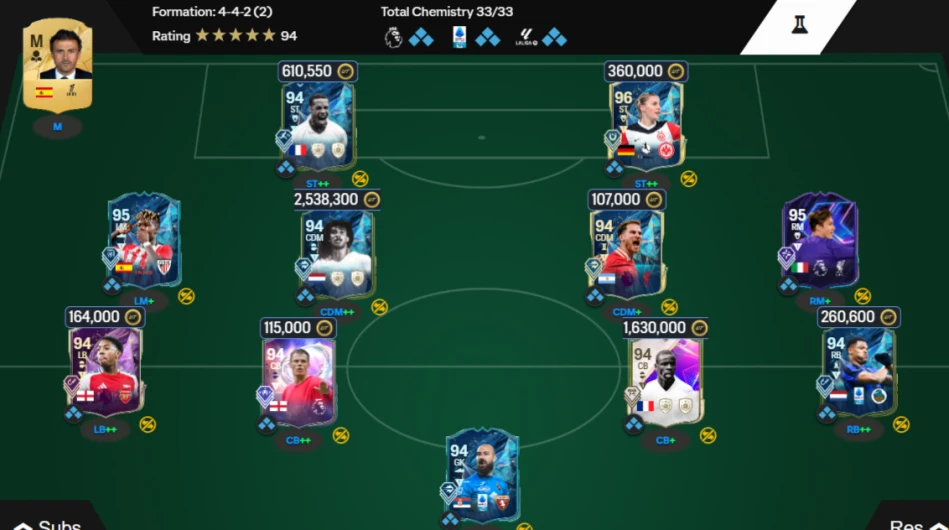
Player Roles & Instructions: The Blueprint
This is where the formation truly comes to life. The way each player behaves in-game depends heavily on their roles and instructions. Here’s how this system is structured.
Strikers (ST)
Right Striker: Advanced Forward with Support
This player plays more like a center forward in practice. Since the formation lacks a true CAM, the right striker drops slightly deeper during build-up play, acting as a pseudo-playmaker. He assists the wingers and the left striker, orchestrating quick moves in the final third. For this role, passing ability is crucial. Someone like Team of the Season Griezmann with the Incisive Pass playstyle is ideal. You want vision, composure, and excellent short passing here.
Left Striker: Advanced Forward with Attack
Unlike the right striker, the left striker’s job is straightforward get in behind. This player doesn't drop deep. Instead, he's always on the shoulder of the last defender, looking to exploit the backline. Pace and finishing are must-haves. Think of him as your primary goal threat. Select a player with high sprint speed, acceleration, and clinical finishing.
Wide Midfielders (LM and RM)
Right Midfielder (RM): Inside Forward with Balance
Left Midfielder (LM):* Inside Forward with Balance
These two operate similarly. Both cut inside from the wings, aiming to link up with your strikers and exploit central spaces. They act almost like narrow wingers or additional forwards, making diagonal runs into the box. Because they drift inside, they’ll be positioned closer to the strikers, increasing your central attacking presence.
Look for players with the Finesse+ or Low Driven+ playstyle traits. You need wingers who can score goals with excellent movement, finishing, and agility.

Central Defensive Midfielders (CDMs)
Right CDM: Playmaker with Build-Up
This is your box-to-box midfielder. He supports in both phases of play helping initiate attacks, providing passing outlets, and recovering defensively when possession is lost. In-game, he might feel like a hybrid between a CM and CDM. Select a well-rounded player here, ideally one with the Deep-Lying Playmaker+ trait. He’ll pass, dribble, tackle, and occasionally arrive late into the box for a shot.
Left CDM: Holding Player with Defend
The anchor. This is your true defensive midfielder. No attacking duties his entire focus is on breaking up play, intercepting passes, and shielding the backline. Choose someone with top-tier physicality, aggression, and defensive awareness. Passing and shooting don’t matter here. His job is to stay deep and cover when others move forward.
Fullbacks (RB and LB)
Both Right Back (RB) and Left Back (LB): Full Back with Defend
No overlap. Keep them home to maintain a solid defensive shape. With your mids and strikers pushing up, you need your back line to stay put, especially against counterattacks. Use fast, defensively solid fullbacks with good tackling and positioning.
Center Backs and Goalkeeper
CBs: Defender and Defend
Goalkeeper: Keeper Sweeper; Pick your best shot-stopper.
In-Game Performance Breakdown
Build-Up Play:
One of the best parts about this formation is the ability to build up in different ways. Want to play fast? The left striker and wide mids offer excellent runs in behind. Prefer patient play? The right striker and right CDM provide safe options to circulate the ball, wait for an opening, then strike.
Your right striker, again, is essential here. Think of him as the central pivot for your attack. He’ll be making smart movements to drag defenders, play short passes, and link up with others. His positioning mimics a CAM, even though he’s listed as a striker.
Attacking Movement:
Because of the inside forward roles, your wide mids frequently cut inside, forming a narrow front four when attacking. This floods the central areas and creates overloads. Meanwhile, your left striker is always stretching the line, giving defenders headaches.
The mix of direct and indirect options makes you unpredictable. Short passes, through balls, cutbacks it’s all viable with this setup.
Defensive Shape:
This is where the 4-4-2 second variation truly shines. With two CDMs, you can press without fear of being exposed. The right CDM supports the attack and then tracks back, while the left CDM stays home to mop up danger.
Your wide mids also contribute defensively, helping cover the flanks and reducing the risk of overloads on the wings. Combined with fullbacks on “Stay Back,” you’ll rarely get caught out of shape—even when pressing high.
Pros and Cons
Pros:
* Strong defensive coverage with two CDMs
* Fluid attacking patterns thanks to dual strikers and inside forwards
* Excellent balance between pressure and protection
* Adaptable build-up suited for both counter and possession styles
* Doesn’t rely on a CAM but still offers playmaking
Cons:
* Less effective if your right striker lacks playmaking ability
* Wide areas can be exposed if your mids fail to track back
* Requires high-quality midfielders to function optimally
Conclusion
If you’re climbing divisions or preparing for FUT Champions, the 4-4-2 (2) formation offers an ideal mix of aggression and security. The custom tactics and player instructions detailed here provide a competitive edge, especially if you tailor your squad to fit the exact roles outlined.
The main takeaway? Use your player roles wisely. Don’t change the structure. Let your right striker drop in to playmaker mode. Trust your left striker to stretch the field. Allow your right CDM to roam and contribute creatively, and depend on your left CDM to anchor everything.
This setup is all about maximizing each role to perfection. If executed correctly, it could be the key to unlocking your best run yet.
We will share more updates on FC 25 in separate articles. If you found this information helpful or would like to learn more, please be sure to explore the other articles on our site.
How Emre Yilmaz Outsmarted the Best to Win the FC 25 eChampions League – Step-by-Step Breakdown
How to Score More Goals in FC 25: Stop Missing Easy Chances With These Shooting Tips