
Why the 4-4-1-1 is Dominating FC 25: Tactics, Tips & Setup
Dick van Dyke

If you’ve been keeping up with the FC 25 meta, you’ve probably noticed one formation appearing repeatedly both in Weekend League and high-level tournaments alike. That formation is the 4-4-1-1. It’s currently one of the most balanced and powerful formations in the game, and you’ll find almost every pro has it saved in their custom tactics.
Whether you’re a competitive player aiming for consistent wins or someone looking to improve their tactical understanding, this formation is a game-changer. In this guide, I’ll break down exactly why the 4-4-1-1 works so well, how to set it up effectively, and how to maximize its strengths both defensively and offensively.

Formation Overview: The Perfect Balance
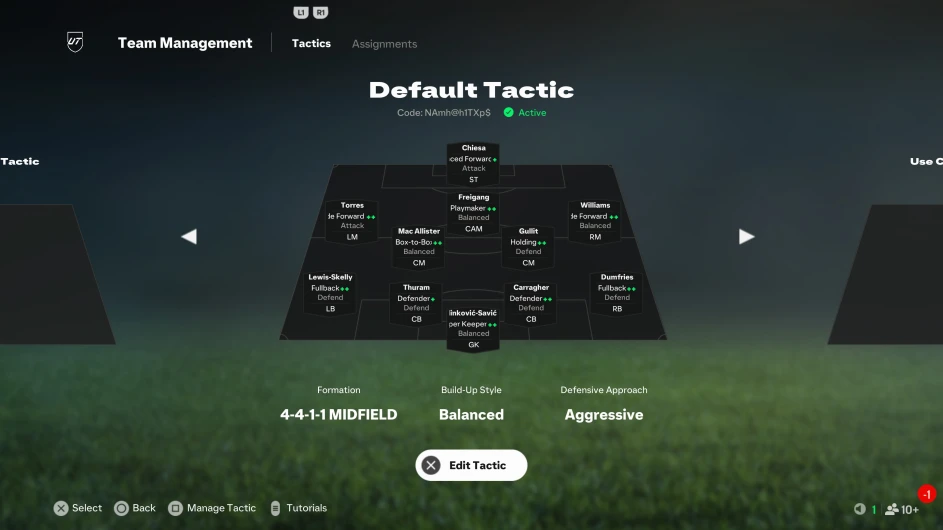
The 4-4-1-1 Midfield version sets you up with *four defenders, four midfielders, a central attacking midfielder (CAM), and a lone striker up front. This shape offers just the right mix of defensive solidity and attacking flexibility, making it incredibly versatile for a wide range of playstyles.
What makes this formation so effective is its control of central midfield space and the natural passing triangles it creates. Midfield control is the key to dominating matches in FC 25, and the 4-4-1-1 provides a well-structured midfield that can both defend stubbornly and launch incisive attacks.
Whether you prefer building up slowly with patient possession or love to hit your opponent on the break, this formation adapts perfectly. Its strength lies in maintaining balance you aren’t overly committing players forward, leaving you exposed, but you also aren’t cramped or lacking attacking options.
Custom Tactics Setup: Fine-Tuning the Balance
Here’s the custom tactics setup I recommend for this formation, which keeps things balanced and flexible.
Tactical Instructions for the 4-3-3
1. Defensive Approach: Balanced
A balanced defensive style helps maintain structure while allowing for counterattacks. It provides flexibility in defending against various styles of play. This setting ensures that your team remains compact defensively and does not overcommit players forward. The Balanced defensive style allows for a mixture of pressing high when necessary and holding a solid shape when under pressure.
2. Line Height: 60
A depth of 40 strikes a balance between pressing high up the pitch and maintaining enough cover at the back. This allows your team to win the ball back quickly while still being cautious of fast counter-attacks.
3. Build-Up Style: Balanced
Why balanced? Sticking with balanced settings helps you maintain shape. It allows you to switch seamlessly between calm, controlled build-ups and quick transitional plays without losing your team’s structure or spacing.
A balanced defensive style means your players won’t overcommit in pressing, which is crucial because the 4-4-1-1 relies on compactness and coordinated midfield defense rather than reckless chasing. The defensive depth at 60 places your defensive line slightly higher than average, helping you apply pressure but not leaving gaping holes for counter-attacks.
Player Instructions: Roles That Make the Formation Tick
Setting the right player instructions is key to getting the most out of the 4-4-1-1 formation. Here’s how I typically arrange instructions across the pitch:
Defenders
Fullbacks: Balanced, or Defend if you want them to stay back and prioritize defense. This depends on your preference and player traits some fullbacks with high stamina and pace can safely push forward.
Center Backs: Default Defender. Stability here is essential, as you don’t want your CBs caught out of position during counter-attacks.
Goalkeeper: Sweeper Keeper is optional based on your comfort level and how much you want your keeper to act aggressively outside the box.
Midfield
One CM on Holding: This player acts as the midfield anchor, shielding the defense and breaking up opposition play. Holding midfielders with high defensive awareness and stamina excel here.
One CM on Box-to-Box: This player is the engine of your team, covering ground relentlessly, contributing both defensively and offensively. For example, pairing Andre Santos as the holder and McAllister as the engine creates excellent balance and dynamism.
CAM: Playmaker or Shadow Striker. If your CAM is more of a deep-lying midfielder (like Bruno), Playmaker is the way to go, dictating tempo and distributing passes. If you have a more attacking CAM (like Kaká), Shadow Striker gives you more aggressive runs into the box, increasing goal-scoring chances.
Left Mid: Inside Forward or Winger depending on your tactics. Inside Forward cuts inside and creates shooting opportunities, while a Winger stays wide and crosses.
Right Mid: Winger, especially if the player has Winger++ traits, maximizing width and pace on the flank.
Attack
Striker: Always set to Advanced Forward to stretch the defense and stay active for through balls and quick passing combinations.
Defensive Shape and Pressing: The Midfield Fortress
The 4-4-1-1 truly shines defensively, especially when pressing high up the pitch. The formation’s structure allows you to apply pressure immediately after losing possession without completely exposing your backline.
Your CAM plays a crucial role here by stepping into the press alongside your striker, forcing the opponent to make hurried decisions. Meanwhile, the four midfielders stay compact and narrow, effectively *cutting off passing lanes through the middle*.
Even if your opponent manages to bypass the press and reach your defensive third, the midfielders drop back quickly to close down space. This compactness is especially effective against players who rely on central build-ups, as it chokes their supply lines and forces errors.
If your opponent tries to exploit the wings, your fullbacks and wide midfielders are there to contain and support, creating a well-rounded defensive unit.
Transitioning from Defense to Attack: Fast and Fluid
One of the standout features of the 4-4-1-1 formation is its *efficiency in fast transitions*. Winning the ball back in midfield or defense often leads to quick counter-attacks that catch opponents off guard.
Imagine this scenario: You regain possession with a midfielder like Bruno, pass it quickly to McAllister, trigger a forward run from your left back, and suddenly your team is stringing together fast, precise passes moving from one penalty box to the other.
Sometimes it only takes five to seven quick passes to go from defense to a high-quality shooting chance. The formation’s natural passing triangles and player positioning make it easy to execute quick one-twos, driven long balls, or through passes.
This transition ability makes the 4-4-1-1 deadly on the break but also versatile enough to patiently build up if your opponent sits back.
Attacking Playstyle: Versatility Is Key
The biggest offensive strength of this formation is variety. You can play quick, direct football with first-time through balls between the CAM and striker, or slow it down with short, patient buildup play.
Focusing on creating triangles and overloads, especially down the wings, opens up multiple attacking avenues. For example, on the left side, you have a natural passing sequence: left back to left mid to central mid. This can create 2v1 situations that help break down stubborn defenses.
If the wide player gets shut down by tight marking, your midfield support is always there for a safe outlet pass, allowing you to recycle possession and look for other openings.
The system rewards players who can read the game well and switch tempo intelligently, alternating between calm possession and explosive attacking moves keeps opponents guessing.
Common Mistakes and How to Avoid Them
Even the best formations can fail if not executed properly. Here are some common pitfalls players encounter with the 4-4-1-1 and how to fix them:
Overcommitting fullbacks: If your fullbacks constantly push too high without proper support, you risk exposing your flanks to quick counters. Adjust their instructions or defensive depth accordingly.
Ignoring midfield roles: The holding CM and box-to-box CM combo is vital. Don’t hesitate to swap out players who lack stamina or defensive awareness for more balanced options.
Neglecting CAM positioning: A CAM too far forward or dropping too deep can disrupt your offensive shape. Experiment with Playmaker vs Shadow Striker instructions depending on your player’s traits.
Relying too much on one attacking route: This formation offers multiple attacking options. Avoid predictable play by mixing wing play, central through balls, and long shots.
Variations and Alternative Setups
The 4-4-1-1 is flexible and can be tweaked to suit different styles or players. Some popular variations include:
More aggressive fullbacks: Set fullbacks to “Join the Attack” if you have fast, strong wide players who can track back quickly.
Higher pressing: Increase defensive depth and switch Defensive Style to “Press After Possession Loss” for a more aggressive pressing game.
CAM-less variant: Drop the CAM and have two strikers up front (essentially a 4-4-2 diamond), but be aware you lose some midfield control.
Experimenting with these tweaks can help you find a setup tailored to your personal strengths and weaknesses.
Conclusion
So, why is the 4-4-1-1 dominating FC 25? It’s all about *balance*. This formation is defensively sound, tactically flexible, and offers enough structure to let you express your playstyle whether you thrive on counter-attacks or possession.
Compared to the 4-4-2, the 4-4-1-1 might not be as aggressive up front, but it’s far more reliable at the back. And when executed properly, it generates just as many scoring chances.
If you’re looking for a formation that gives you total control on both ends of the pitch, the 4-4-1-1 is an absolute must-try. It’s a solid foundation for building your tactical game in FC 25 and climbing the ranks.
We will share more updates on FC 25 in separate articles. If you found this information helpful or would like to learn more, please explore the other articles on our site.
Antony Matheus dos Santos – TOTS Honourable Mentions: Player review
How to Get 95-Rated Thierry Henry in FC 25 (Five-Star Five-Star Version)